November Beauty Products

I want to start doing this once per month.  I think it's fun to share some of the different beauty products that I am currently trying out.  I am always looking for new ones and love seeing what gives the best results.  I am hoping to film a video of this as well so I can elaborate a little more and give you a better feel for each product, but for now I wanted to make it a blog post.   
Let me know if you would like me to do this each month! 


Urban Decay b6 Prep Spray (here)


I've never used a prep spray before so I am not really sure what I can compare it to, but I've been using this product for several months now and have no complaints.  It's a vitamin-infused complexion prep spray that minimizes pores, reduces redness and absorbs oil.  You are supposed to spray your face before applying moisturizer and then you can also use it during the day to refresh your skin.  It's great for giving your skin a quick dose of vitamins and keeping it hydrated.  It's definitely become part of my morning routine.

Origins GinZing Energy Boosting Moisturizer (here)


I've tried out a ton of different moisturizers from Clinque, Olay, Aveeno, Ponds, and more but this has been my first time trying out one from Origins. My favorite part about this one in particular is that it's energy boosting and truly helps wake me up each morning.  It contains skin-boosters like Panax Ginseng and Coffee Bean. I apply this to my face and neck and after using the prep spray every morning and then I apply it again at night before bed.  It is so important to take care of our skin and lately I'm becoming obsessed with trying out a ton of different skincare products.  This also smells really good, leaves my skin feeling very smooth and adds a natural glow.  


Make Up For Ever: UpLight Face Luminizer Gel (here)


I bought this a few weeks ago, and so far it's been great.  It's a silky gel that naturally brightens up your face.  You are only supposed to use a little bit and tap it under your eyes.  You can also put a little bit on the inside corners of your eye and the corners of your eye lids on top of your eyeshadow.  It really helps to brighten up that whole area and prevents you from looking tired.  Just be careful not to pump too hard, otherwise way too much will come out.  I made that mistake as soon as I opened it up! The bottle is small, but they said it lasts awhile, so I will soon find out. 


EOS Lip Balm (here)


I'm completely obsessed and use this every single day.  I'm actually surprised I didn't start using these sooner.  I have the pink and red ones.  It's obviously so important to keep our lips moisturized, especially during the cold months.  But I also use this to prevent feathering from my lipstick.  I hate wearing a lipstick color that starts to peel after wearing it for a few hours.  Prepping my lips with lip balm before applying the lipstick has helped make a huge difference! 

I think when it comes to beauty products, things might work differently for everyone.  But if you are looking to try something new, I highly suggest all of these.  If any of you have any recommendations for products that I could try out, please share!

On another note, I'll be co-hosting the "Flirty & Feminine" party tonight in the Poshmark app at 7pm PST with fellow blogger Paulina.  You can shop the closets of thousands of girls and share all of your listings to the party as well.  The app is now available on both iPhone and Android and if you sign up with the code HNFBD,  you will receive a $5 credit.

Have a great day!
XOXO


{Nailed It} L'Oreal Press-On Nails

 photo IMG_9025_zps88497b3b.jpg

For the sake of nostalgia, I decided to put my feelings about press-on nails aside (junior high flashbacks, anyone?) just long enough to test out L'Oreal's Colour Riche Press-On Nails in 'Midnight French.' The finish caught my eye immediately (cute, right?), and it reminded me of this manicure I never quite was able to replicate. Fun finger effects aside, here's the low down on the kit:

 photo loreal_zps2ff41361.jpg

The nails were quite easy to apply, but since they skewed a little larger, it was hard to find matches for some of my nails. And even though I followed the directions to a t, one fell off mere hours later. All in all, they felt fake and frumpy, and my stance on press-ons has forever been reaffirmed — no matter how cute the finish. xx

 photo IMG_9007_zps0730c76b.jpg

My Favorite HairStyle With Neutrogena Triple Moisture

Disclosure: This is a compensated campaign in collaboration with Latina Bloggers Connect and Neutrogena.  This was post was written by me and not edited by any third parties.  It expresses my true opinions. 

I think we can all agree that a good hair day makes us feel great and confident.  That's probably why so many women love going to the salon to get their hair done.  I know that every time I leave the salon, I sort of feel like a new person.  They always make my hair look and feel so healthy. But the truth is that most of us can't afford to have our hair professionally done each week and most of us don't have the time either.  I am all for doing things myself at home and with the right products, we can get that salon feel all on our own! 

I definitely have a love/hate relationship with my hair.  It's really thick and now that it's gotten so long, it takes longer to style.  My hair in it's natural state is really weird... it's straight on top, wavy towards the middle and bottom and curly underneath.  When I let it air dry, it gets a lot of volume but it also gets really frizzy.  I have rarely used any products in my hair so I was really looking forward to trying out the Neutrogena Triple Moisture line.  In this post, I am going to show the step by step process of how I do my go to hairstyle with these products from start to finish.  I think every woman has a favorite hair style that makes her feel confident and beautiful.  For me, it's wavy curls!  


Step 1: In the shower, I used the Triple Moisture Cream Lather Shampoo & Daily Deep Conditioner.  Both products gave an intense moisture to my hair and the scent is amazing. 

Step 2: Next in the shower, I applied the Deep Recovery Mask to my ends.  This is a great treatment to use weekly especially for extra dry and over-processed color treated hair.  I love how smooth my hair was after getting out of the shower. 

Step 3 & 4: After showering, I applied the Silk Touch Leave-In Cream to my wet hair focusing mostly on the ends.  This really helps manage frizzies and helps to smooth out those damaged strands.  

Step 5: After applying the cream, I brush my hair with a paddle brush to get out all of the knots and prep for drying.  

Step 6:  Time to blow dry!  Since I am curling my hair, I don't blow dry with a round brush.  I just want to make sure that my hair is as dry as possible so the curls will hold.  


This is pretty much how I feel every time I have to tame my mane lol 


Step 7:  After my hair is dry, I separate to start the curling process.  I always start with the bottom half first and work my way up. 

Step 8: I use a 1-1/2" wand from Remington and always use it at it's highest temperature (410).  I hold the wand down, wrap my hair around in an outward motion and hold for about 10-15 seconds.  

Step 9 & 10: I continue this process until all of the pieces are curled always going section by section with the wand down.  

Step 11 & 12: Since I'm going for more of a wavy curl look, I like to separate the curls with my fingers.  It creates more volume and won't make your hair look "too curled."  I do this all around my head and then use hair spray. 


The end result! I have to say that usually when I curl my hair right after washing it, it doesn't hold as well.  But styling my hair before with these products really helped to keep the curls.  Overall, I really do like these products and will continue to use them. They didn't make my hair dry or greasy as some hair products tend to do. They make my hair smell so good and look shiny and healthy.  It's so much more manageable to style now :) 


You can learn more about these Neutrogena products HERE

Hope you enjoyed today's post and thanks so much for taking the time to check it out. I'd love to know which hairstyle makes you feel confident and in control!
<3


HANA PRO REVIEW

It's been awhile since I did a beauty post or a review and since it's raining outside, I thought today would be the perfect day for both :)


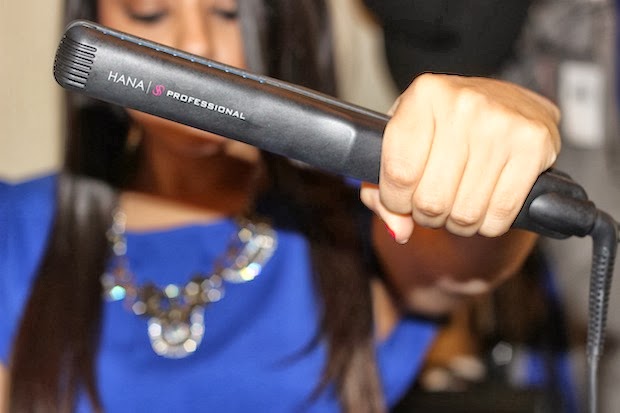
 For the past month, I have been trying out the HANA PRO 1" ceramic flat iron from Misikko.  It's been featured in Marie Claire and RedBook magazines and now I know why! I hadn't used a flat iron in awhile so I was really curious to see how this one would work for me. I obviously knew that my hair had gotten really long, but after using this I saw it's true length (I seriously need a trim!)  Up until now, I've mostly just been blow drying with a jumbo brush because I like having a little bit of volume.  But after using this straightener, I saw that it didn't leave my hair too flat which I really like! A little trick that I have learned to do after using a flat iron is to tease your roots a bit with either a comb or even your fingers.  I only use my fingers and do it just enough so that it lifts a little bit. I know that there are also products like root lifter sprays which help of course too.

Sometimes when using a flat iron, it can make your hair look dry and damaged.  I am happy to say that I did not have that problem with the HANA PRO.  As you can see in the photos below it looks somewhat shiny and even healthy.  I did not put any products in after straightening.


Top: OASAP/ Necklace: Shop Lately 

SOME HANA PRO FEATURES 

- Curved plate edges for versatile styling so you can curl, flip or straighten 
- Advanced tourmaline ceramic plates for accelerated ion generation and maximum free-frizz, conditioning shine 
- Floating 1" plates auto-adjust to glide over any hair texture 
- Adjustable temperature dial 
- Ergonomic handle design with no-slip grip 
- Two year warranty 


PRICE
 Currently on sale $128.98 


The flat iron came with a heat proof pouch and this silicone mat.  I have never put a mat on my bathroom counter when using flat irons or curling wands, so I am really happy I got this.
It's only been a month, but so far I really love this flat iron and truly don't have any complaints.    It didn't take me long to use either, only about 10 minutes or less.  I highly recommend this one! 

 You can check out more info on the HANA PRO here

<3


Beauté ...

                                                                                 CLICK TO SEE MORE

Today I wanna share with you updated version (old post Here) of my favorite make up and facial care products:
1. The Body Shop - Seaweed pore-cleansing facial exfoliator - which is my favorite face scrub of all time.
2. The Body Shop  - Seaweed mattifying day cream - light perfect for sunny days
3. The Body Shop - Vitamin E moisture cream - I use this during the whole year and prefer it more than the Seaweed.
4. I love Raspberry and blackberry - body lotion
5. Bourjois Little round pot blush - 34 (using it for years)
6. Bourjois Healthy mix Foundation - 52 during the winter, 54 during the summer period
7. Bourjois Loose Powder - 02  - best loose powder ever
8. Dior Diorshow Blackout mascara (using it for years)
9. Avon Kohl eye liner - black - with my sensitive eyes I more than satisfied with this product
10. L'Oreal Glam Bronze Duo

These are my favorites, how about yours?
What's one item you can't leave your house without? :)

{Beauty} Ikat Nail DIY...

 photo IkatNailDIY_zpse4aac04f.jpg

Who's ready for the easiest DIY mani ever? I've done the whole ikat nail wrap thing in the past, but I never realized just how easy (and inexpensive) it is to recreate the look yourself. It's literally as easy as one-two-three!


 photo IkatNailDIYGuide_zpsc918841e.jpg 

Just paint your nails a bold base colour (like red!), and once that dries, make narrow, asymmetrical shapes in white. Using a small brush, paint your third colour (blue anyone?) in the center of the white shapes, finishing it off with a top coat... What a cinch!

Thanks for reading friends, and if you have any fun, easy nail DIYs of your own, I'm all ears! xx

Hair and Beauty

I am back to blogging (as in posting) but I still need to get around to catching up on everyone else's blogs. I've got quite a lot going on at the moment so I promise after next week I'll be right on it! I might start organising my time better and giving myself more time for blog reading as I really should/would like to do more of that. I might go on a bit of a blog hunt as well and find a few newbies to add to my collection! 
I haven't really talked much about hair and makeup on my blog as it's not really my 'thing' as it were, but I thought I'd step aside from the fashion slightly for this post. I'm in that phase at the moment where I really want to do something different with my hair, do you ever get that? Uh huh...well...every year or so this happens to me. I never end up changing anything drastic (...ever!) but I'll spend my time collecting images of how I wish my hair could be if I could do anything. So below are an assortment of hair and makeup ideas that I've collected recently....

All images from Pinterest

{Beauty} The Studded Nail Wrap...

 photo nailtrend2013_zpsd6f6c542.jpg

Always down for a good nail wrap, I jumped at the chance to try Essie's studded nail wraps when I came across them a few weeks ago and was pleasantly surprised with the result. Not only did they last forever and bring new life to a classic red mani, but they got compliments every which way I turned. Not to sound too definitive or anything, but I would go so far as to dub the studded mani (in wrap form or otherwise) the top nail trend of the season... But I'm dramatic like that.

Soooo, what's your favourite nail trend this season? Any must-trys? Spill! xx

{Summer Week} The Nails...

 photo watermelonnailscopy_zps7dbca840.jpg 

It's no secret I love nail polish, and even if you spent three seconds on my Instagram, you would know that I have a serious sweet tooth as well... Luckily for me the two go together like nobody's business, and I certainly can't complain about having edible props for a change!

Above are my favourite shades/wraps for summer in the digit-department — And believe me when I tell you it was nearly impossible to narrow it down to just six. From sizzling shades of hot pink and neon green, to softer pallets brimming with mints and lilacs, I'm always down for a fun summer mani... Oh the possibilities.

So tell me friends, what are your favourite shades for summer? Spill! xx

Lipstick Lover: Urban Decay

With the fall season approaching, one of the things that I love to do is wear bolder/darker shades of lipstick.  You may have noticed that lately I have been wearing a different shade in almost every post.  Since I received the fall collection of Urban Decay's Revolution lipsticks, I wanted to start trying them out as soon as possible.  Here are 4 shades that I am absolutely loving at the moment for fall! 


Top Left: SHAME 

This one is a deep berry with subtle hints of brown shimmer.  Even though it's dark, it goes on lighter than what you would expect.  I absolutely love the color, but when putting it on I did notice that it was a little streaky.  It seemed as though I had to apply a little more than normal to make sure that it looked even.  However, I didn't have any issues after wearing it and I think I am putting it on again today!


Top Right: VENOM 

This is a bright plum with a violet and fuchsia shimmer.  It has more of a purple tint than Shame.  I had it on for several hours and it left a stain so I didn't have to keep applying.  As much as I love my reds, I really loved wearing this purple shade with my all black outfit.  Purple just might be the new red next season when it comes to lipstick, at least for me.  


Bottom Left: F-BOMB

This is a classic shade of red that has replaced my previous favorites, MAC Russian Red & Ruby Woo. I can't even believe I am saying that because I have been obsessed with those 2 shades for the longest time, but it's the truth.  I wore this all day and not once did it smear or come off.  Even at the end of the day my lips were still stained with red which proves how intense the pigmentation is in this entire collection.  Wearing a bold red like this tends to scare off some girls because they don't want it to get messy during the day while they're out eating/drinking etc.  But you don't have to worry about that with this one! 


Bottom Right: 69

This is a bright red but it has a pink undertone so it's not as bold/deep as F-Bomb.  It has a creamy finish which I loved because it gives it that "glossy" look.  It lasted for hours and also left a stain behind.  I didn't have any issues with eating or drinking while wearing it.  I think it's a great shade when you want to wear red but don't want something that's too dark or bold.  


Which one is your favorite? 

XO


Urban Decay Revolution Dinner Party

Last week I had the pleasure of attending a dinner party at Rayuela in NYC for
  Urban Decay's Revolution lipstick launch.  It was so great to be in a room filled with such amazing Latinas!  All of the women there were so inspiring and I am so happy that I got to be apart of it.  It was a night filled with delicious food, yummy cocktails, great conversation and of course a ton of cosmetics from UD's new fall collection.  Does it get much better?  That's my kind of dinner party! 

I've been using Urban Decay's Naked 1 & 2 palettes for close to a year now and they are my every day eye shadows.  I've also been using their eye primer for awhile as well which I absolutely love. Their fall collection includes 22 revolution lipsticks that are all to die for! There's such a great variety of shades from every day nudes, to bright pinks, deep reds and bold corals.  You're sure to find a favorite.  Each lipstick is intensely pigmented with a super creamy texture.  They have a nourishing blend of jojoba oil, avocado oil, cocoa butter and shea butter keeping lips soft and moisturized all day long. They also hydrate the lips while making them look plumper and fuller with their special technique, Maxi-Lip.
 For me, I prefer going light on the eyes and using a bold lip color so I was in lipstick heaven!


In addition to the lipsticks, they also came out with 24/7 Glide-On lip pencils.  One of the things I loved the most was that the names matched the same name as the lipsticks.  That just makes things so much easier.  So far I've tried out 3 different lipsticks and liners and I have to say that they're all amazing.  I didn't have to keep reapplying through out the day even after eating and drinking. I will be doing reviews soon on my favorite shades.  They also showed us some of their ultra definition finishing powder, anti-aging eyeshadow primer potion, B6 prep spray, brow box and nail polishes. 


This drink was so badass which is why they called it Badass Luxury. Ha! It was infused with rose petals.


I want to go back to that restaurant just for this! Tuna filled with crab meat and shrimp.  Too good.


With half of the group posing with our lip straws lol
I attended the dinner with my two Jersey blogger babes Nadia and Erika.  It really was such a fun and fab night!


They gave us all the most amazing gift bags.  I think I am set with makeup for a long time now! I can't wait to share my reviews with you all.  I am seriously so appreciative and very thankful for all that has been happening for me and my blog.  The best part about blogging is building new relationships and friendships with incredible people.  It's inspiring and motivating to connect with others who share the same passions and interests as I do.  It makes me want to challenge myself and to continue to be the best that I can be. For that, I am extremely grateful.  These are experiences that I will never forget.

A special thank you to Maria Ramirez from Alison Brod Public Relations and Urban Decay for having me at this fabulous event!! 


<3

Popular Posts